DIY Marquee Lights
Download our “2017” template to create a DIY marquee sign and celebrate the New Year or create your own template to see your name in lights. Here are step-by-step instructions for an indoor DIY marquee sign perfect for dressers and mantels.
Materials Needed:
Foam board
Poster board
Light stringer and bulbs
Pencil
Printed template
Tape, if painting use white painters tape
X-ACTO™ knife and scissors
Duct tape
Spray paint and cornered sponge brush, if desired
Steps:
1-2. Cut out and trace characters onto foam board. Use tape on the back of the paper to secure the cutouts to the foam if needed.
3. Remove your template and cut the foam along your trace lines.
4. Cut strips of poster board a half an inch wider than your bulbs. Our sign used 1.5-inch bulbs so we cut 2-inch strips. Tape the poster board strips along the edge of foam board so that they create a frame around the bulbs.

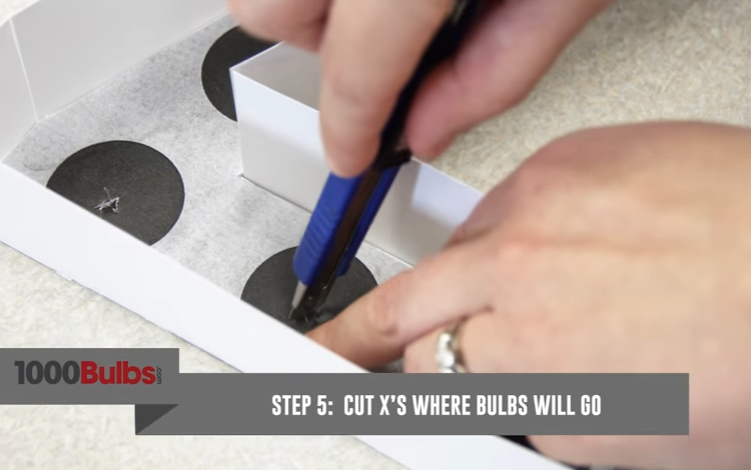
5. Using an X-ACTO™ knife, cut small X's in the center of characters, spaced so there is about a half inch gap between the bulbs. For our 1.5 inches diameter bulbs, so we spaced the holes two inches apart.
6-8. Gently enlarge the opening. Use a pencil to start and then slowly gauge up until the opening is large enough for the bulb without tearing the foam. Then use the base of one of the bulbs through each hole to make sure they’re large enough.
9. Line up your sign so all of the characters are facing the correct way.
10. Spray paint if desired. Use the cornered sponge brush to get into the corners so paint doesn’t build up.
11. Take a few moments to plan out how you’ll be connecting each character.
12. Hold the socket against the back of the character over the hole, push and twist until the bulb is securely in the socket.

13. Screw in all of your light bulbs.
14. Tape down the wire on the back of the character with duct tape.
15. Place your marquee sign where you want it displayed, and plug it in*. You may require an extension cord depending on the placement of the sign and outlets.
16. Love your new marquee sign! Send us a picture on Facebook, Twitter, or Pinterest.
*After you plug in the stringer, you may need to keep screwing in the bulbs until they light up.