How To Install Cove Lighting
This is our step-by-step guide of how to wire cove lighting with pre-installed crown molding and LED rope or strip lights. But wait, what is cove lighting? Cove lighting is a form of indirect lighting typically built into ledges like crown molding, valences and cornices for windows, or any upper-wall recesses of a room. Light is directed up towards the ceiling and can be used as primary or ambient light, yet is commonly used as decorative lighting to accent a room or highlight particularly embellished ceilings.
Installing cove lighting is moderately stress-free when using LED rope or strip lighting (aka tape light). However, wiring the lights correctly requires some precision and a basic knowledge of electrical work. If hack saws give you the heebie-jeebies or you experience mild to severe electrophobia (which is a real thing), it’s best to have your project handled by professionals.
Before you begin, you will want to take some accurate measurements of the molding and pay special attention to where your outlets are located. Your lighting is going to need a power source and while there are several ways of supplying power, each method requires wiring back to the main circuitry of your home, usually via an outlet. It should also be noted that for some of the wiring options, the molding, crown or otherwise, should be painted and installed after the lighting. Only the base boards for the molding should be painted and in position at that point and all molding should have at least a 2-inch gap between the molding and the ceiling. The gap width varies because it depends on how much light you want spread across the ceiling and how you decide to wire your chosen light source. You will need to create a space to house the driver for your lights in the molding. Typically, this is done by cutting out a section of the base board that the molding is attached to, so the driver can sit below the light and remain unseen. You can contact your local contactor to properly install the molding and base.
Materials Needed
An appropriate length of LED rope light or strip light /tape light*, equivalent to the length of your molding
Connector cord (from lights to driver, rectified power cord for rope light)
An appropriately-rated receptacle (i.e. outlet, we recommend a 20-amp AFCI outlet)
Junction box (for outlet and/or dimmer switch installation)
End caps
Drill (with a large drill bit, like the kind for making holes in wood)
Additional Materials (optional)
4-pin connectors (tape light) or In-line Splice Connectors (rope light)
Y-splitter cord
T-Shape, L-Shape, or Plus-Shape (i.e. X-Shape) connectors
Silicone glue (highly recommended)
Velcro strips
*If you choose to use 12-volt LED tape light, the brighter and lighter brother of LED rope light, your maximum run is limited to about 16 feet before the voltage drop kicks in. If you need to add more length to the amount of tape light stretching around your room, you will need to add a driver and supply power every 16 feet. LED rope light can be extended in longer runs for larger rooms and requires LED transformers to step-down the voltage for lower voltage types. For this installation, we will assume you will want to connect to a 120-volt standard alternating current (AC) power source and therefore you need an AC LED transformer and a rectifier to change the lower voltage from AC to Direct Current (DC). You also need a rectified power cord to use 120-volt rope light as well.
Assembly Required
Step 1 – Measure your lights. Whether you use LED tape light or rope light, the first step is measuring out your selected light for the length of the cove. This may require cutting and/or splicing the lights to turn corners or branch out in different directions. When you cut either light source, you must be sure to cut in the indicated area. Both types of lights have clearly marked cutting lines, commonly dotted, in order to maintain the functionality of the light. You should only cut where indicated.
Rope light generally comes in several wiring and voltage varieties. Rope lights are made in 12, 24, and 120-volt varieties with 2, 3, 4, and 5-wire configuration. The more wires you have, the more likely your rope light can dim, flash, and execute a chasing mode with the right controller. Also depending on how many wires your rope light has, you will need a corresponding number of pins in the connectors to match. LED strip or tape lights come in 12-volt or 24-volt varieties. While 24-volt tape light can be used for longer run, perhaps another 2 feet, it is still not generally recommended that you run tape light for longer than 16 feet. You can learn more about choosing, installing, and troubleshooting tape light in our 3-part LED Strip Light Guide.
Step 2 – Mount your lights. Check to see what position helps your lights to achieve the effect you want before making permanent adjustments. With tape light, you can remove the protective paper backing from several feet, line it up with the base board while keeping it close enough to be hidden by the molding, and apply it directly to the wall. To maintain some flexibility, leave the paper backing on the first few feet of the tape light where the end would connect to the driver; you can remove it once the driver is wired and in place. You can also adhere the lights to the crown molding, once it is in place, bouncing the light against the corner of the wall and onto the ceiling.
If you decide to use rope light, you can simply lay the rope light in the trough created by the molding or use clear rope light channel raceways for really clean, straight lines. For convenience, attach a strip of Velcro to the driver and the notch in the base board where the driver would sit.
“Don’t forget to turn off the power from the main breaker panel to the part of the house you’re working on! ”
Step 3 – Wire you lights. First locate the main power source. Every option requires an eventual wiring to the main power source. The easiest way to do this is to dismantle an already existing socket. Keep the main power wired to the outlet and depending on the location, you need to interrupt the current circuit to include your driver or new outlet. Once you have decided where your lights and driver will go, you have 3 wiring options.
1) Driver to power source. The first and most straightforward option is to wire the driver directly to the power from your house and keep the lights always on. This would mean your driver has freestanding wires. Typically, there is one positive (i.e. “hot” or “live”) and one negative (i.e. “neutral”) wire to connect to the tape or rope light. Alongside a green ground wire, another positive and negative wire would connect to the wiring of the house. For safety reasons, all wiring connections involving wire nuts must be housed inside a junction box or j-box. By locating your nearest outlet (which should be housed in a j-box), the wires from your driver can connect to the main power. You will need to carefully cut a hole in the wall to access the power source wiring, feed the wires down to your chosen outlet, and slice the wiring located there. You will need to disassemble the outlet to add the driver's wire to in-going power source wiring. Strip a one-inch piece of insulation off the newly-made ends of the wires, inside the wall and on the driver. Using wire nuts, you can connect the ground, positive, and negative wires to the corresponding wires from inside the wall. Please note that a bare wire, one without any colored insulation, is most likely the ground wire for the main power source inside the majority of homes. If you feel you have too much extra wire, especially on the driver, you can trim it but leave enough to reach inside the wall without strain and gently push all the extra wiring into the hole. Also keep in mind that the rope light transformer will need a rectifier attached or built into it to properly regulate the power before you wire it to rope lights.
When wiring any electrical devices to a source, remember that “like meets like”. Always wire a live wire to another live wire. Similarly, a neutral wire should be wired to another neutral wire. Don’t ever cross wires or you run the serious risk of fried electronics, fire, or electrical shock.
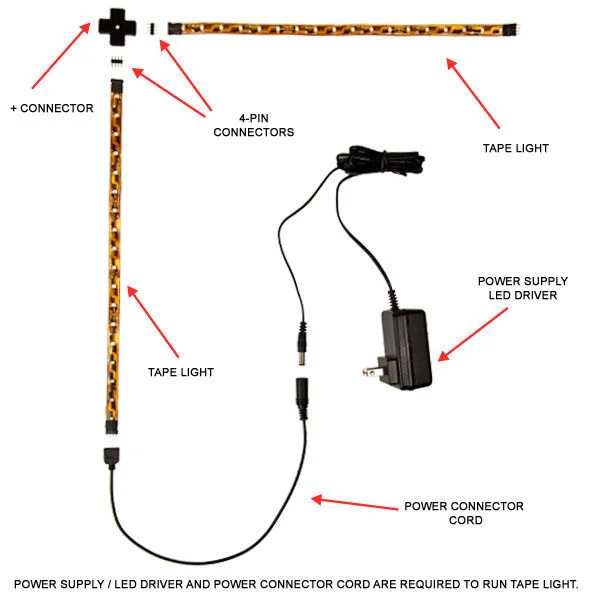
Basic tape light installation components
2) Driver (with molded or built-in plug) to outlet to power source. The second option is an extension of the first direct wire option and more commonly used. If your driver is built into a cord with a molded plug (the kind you plug into an outlet), then you need a connector cord to join the tape or rope light to the driver or transformer. You also need cut into the wall, just like option #1, but this time you are making a rectangular hole for an outlet and its junction box to fit into. Instead of wiring the driver to the main power, you would install an outlet there. Hidden by the molding, the outlet would complete the circuit, running from the main power source through the new outlet to the next outlet, nearer to the floor. When the new outlet is installed, you can plug in your lights and call it a day. Please note that the National Electric Code now requires AFCI protection and/or GFCI outlets in some rooms of the home. When adding a new outlet to a run, you may need to upgrade the first receptacle in the run to comply with recent code changes.
3) Driver to dimmer switch to outlet to power source. Check your driver or transformer before you attempt this option. Your driver’s specifications should mention if it is dimmable and which dimmer switches have the best compatibility. Offering the most control, the third option is the most complex. Like option #1, you begin by cutting a hole in the wall. Next, cut another opening in the wall at a comfortable level for a dimmer switch and its junction box, preferably in line with closest outlet. You would insert the one hot wire, one neutral wire, and the ground wire from the driver into the hole near the ceiling and feed the wires to the second opening where the switch will go. Then join the driver wires to the switch and the switch to the next outlet. The dimmer switch will have two hot wires, one wire should connect to the driver above and the other hot wire goes to the outlet below. The ground wire from the switch should be connected with the ground wires from the driver and the outlet. Also connect the neutral wires from the driver and the outlet together.
After you have wired your lights to the configuration you prefer, you are done with the lighting installation. If you haven’t already, you can finish adding your cove molding at this point. Items like T-shape connectors and Y-splitters are great to branch off rope or tape light in different directions for a versatile arrangement. Another tip suggests adding a dab of silicone glue to the spliced ends of your rope/tape light to ensure a tight fit for your end caps. Warm-colored lights do better in rooms with warm hues of paint, highlighting the red, orange, and yellow tones. While cooler lights brighten and enlarge rooms with blue, green, or purple wall colors. Read more about matching color temperatures to wall paints in our article, How To Choose Lighting For Paint Colors.
Leave your clever tips for lighting installations, suggestions for jaw-droppingly impressive how-tos, or questions on what do if your lights don’t turn on, in the comment area below. We also want to celebrate your success, so send us a picture of your genius projects by sharing on our Facebook, Twitter, LinkedIn, or Pinterest. A reader once asked, “How many 1000Bulbs.com staff members does it take to screw in a lightbulb?” The answer is four; one marketing team member to tweet about it, one customer service rep to make sure the bulb is satisfied, one executive to delegate the process (and possibly hold the ladder), and finally, one electrician to actually screw in the bulb.