


LED Light Suit Costume DIY Tutorial
Have you been wondering how to make the same costume as the little toddler in the very popular and recently viral, "Baby LED light suit Halloween costume preview" video? Due to popular demand, we have brought you this quick tutorial on how to make an LED light suit costume. A video will be created this coming week, but in the meantime, here's our guide.
Materials:
Hoodie
Sweat Pants (one with pockets is best)
Adhesive spray, fabric glue or tape. Be careful with the clear tape as it may become illuminated from the light. However, that could give you an interesting look if done correctly.
17 standard LED tape lights. Note: This number is dependent upon how big the hoodie and sweat pants are. We used an XL men's sweatshirt and large men's pants, which is why it had so many pieces.
1 12-inch adapters. These connect single color dimmer or signal repeater for 12-volt LED tape light.
2 12-inch Y-splitter interconnection cables for 12-volt LED tape light.
3 2-inch interconnection cables for 12-volt LED tape light.
1 36-inch interconnection cables for 12-volt LED tape light.
Unfortunately, we don't sell these last two items, but you can pick them up at any electronics store, such as Fry's:
|
Description |
Image |
|
9V battery snap, with 3-inch wire leads. You might want two of these just in case. |
 |
|
(8) AA cell battery holder, standard snap terminals. You may want two of these as well. |
 |
How to make the LED Light Suit
To make your LED light suit, follow these steps:
|
Steps |
Image |
|
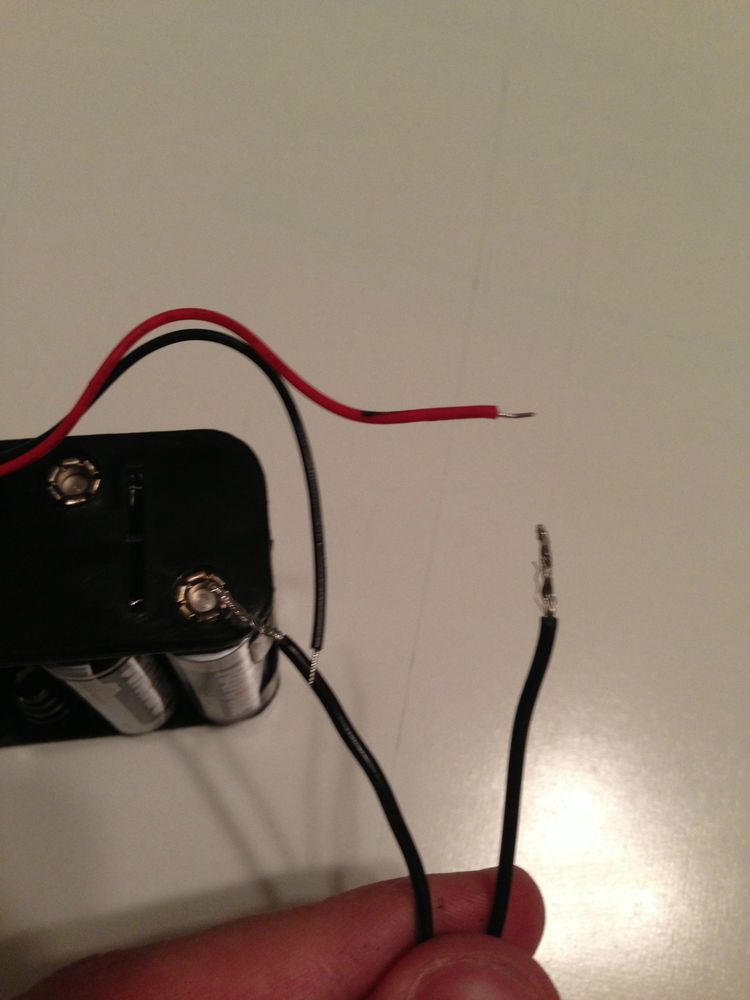
1 - Attach the 9V battery snap to the AA cell battery holder. |
 |
|
2 - Cut off the end of the y connector. Attach both of the 12-inch Y-splitter interconnection cable wires to the 9V battery snaps wires. We suggest that you use electrical tape and possibly caps to keep them connected.
|
 |
|
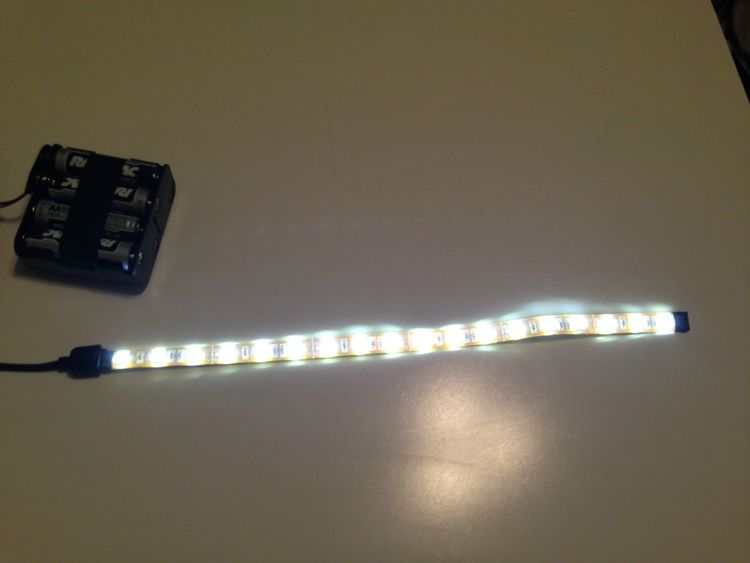
3 - Once the wires are connected, simply attach the piece of LED tape light to make sure it works. Be sure to have the arrow on the Y connector on the top left side when you connect the tape light. Otherwise, it won't turn on. |
|
|
Once it's connected, this is what it should look like: |
 |
|
4 - From this point on, how you connect it all together is up to you and will vary based on height and size. We suggest that you connect the 36-inch interconnection cable to one of the Y connections and lead the 36-inch interconnection cable up through the inside of the sweat shirt. We did this to make the right arm connect. |
 |
|
5 - For the center, hood, and left arm, we had all of the LED tape lights connected to each other. The middle strip of lights on the hoodie leads up to the beginning of the hoodie on the left side. Once you've connected all of the tape light around the hoodie you can connect the hoodie to the left arm. We left this clasp undone so that taking off the hoodie would be easier. |
 |
|
6 - For the legs, it's pretty simple. Your last two connections from the Y connection cable should be used for your legs. We suggest that you have the strips go all the way up to the waist band for the best stick figure effect. |
 |
Now you're all set! Have a great Halloween! If you liked this tutorial or have a question let us know by sending us a message or leaving a comment.
Note: The 2-inch interconnection cables are for maneuverability. It's not required, but we do suggest that you have 1 or 2.
Some tips:
If you buy the 24-volt high output tape light, the light from the strips will be too bright for you to take any photos. You quite literally will light up the entire room and become a blur in photos and video. However, if you do decide to go this route, it will still work as a regular light suit if you purchase a dimmer.
Each of these tape light pieces is only five watts, so there's no danger in harming yourself if you have a lot of them connected to each other. For example, we connected nine at once with no problem.
Tape the battery pack and put the strips on the hoodie one at a time.
Make sure the right sides are connected to each other.
Using the 3-inch interconnection cable sometimes loses the current if more than one strand of tape light is used.
Try to leave some wiggle room in the neck area so the LED tape light doesn't get disconnected every time you move your head up and down.
If you haven't seen our version of the LED light suit baby, check it out here.
Warning: Just remember to use care when around electrical equipment. We are not liable if you accidentally shock, electrocute, or harm yourself in any way from using this tutorial. That being said, it’s highly unlikely that will happen.
Bonus: LED Light Suit Painting


